
A microscope is an optical precision instrument that magnifies objects that are too small to be seen in a naked human eye, producing an image in which the observed object appears much larger.
Microscopes have been used to explore the cells, microorganisms and other small objects since the mid 1600s when Robert Hooke and Antonie van Leeuwenhoek took us to the new ear with their microscope discovery.
Microscope is most commonly used in sectors like microbiology, chemistry, pathology, biology, geology, material science and engineering where precise visual analysis is crucial on microstructures for research and analysis.
The parts of the microscope and their uses are generally divided into two major categories: structural parts and optical parts. Structural parts for holding and providing support to microscope parts and optical parts are used for magnification and viewing of the object.
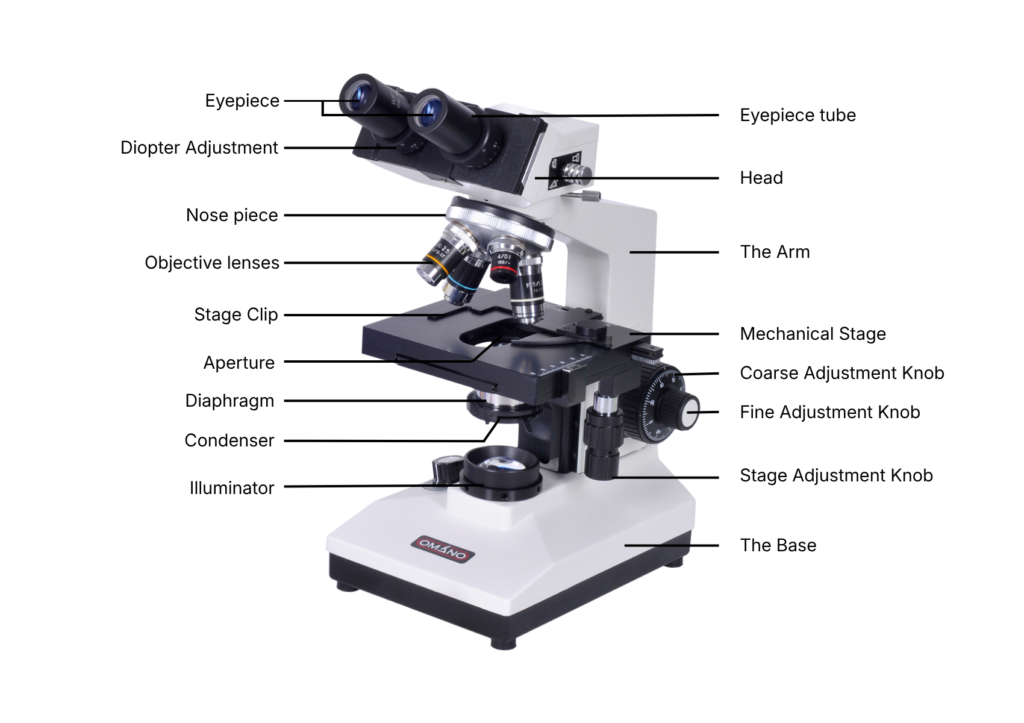
Figure 1: Labeled Diagram of the Parts of a Microscope
Structural Parts of a Microscope and its Functions
The structural part of a microscope gives the support and holds all the optical components of a microscope. Structural parts of a microscope are; head, arm, and base.
1. Head: The head, also known as the body tube, is the uppermost part of the microscope. The head connects the eyepiece and objective lenses. The primary function of the head is to maintain the accurate optical length between eyepiece and objective lens for proper image formation. The head also ensures that light travels in a fixed path.
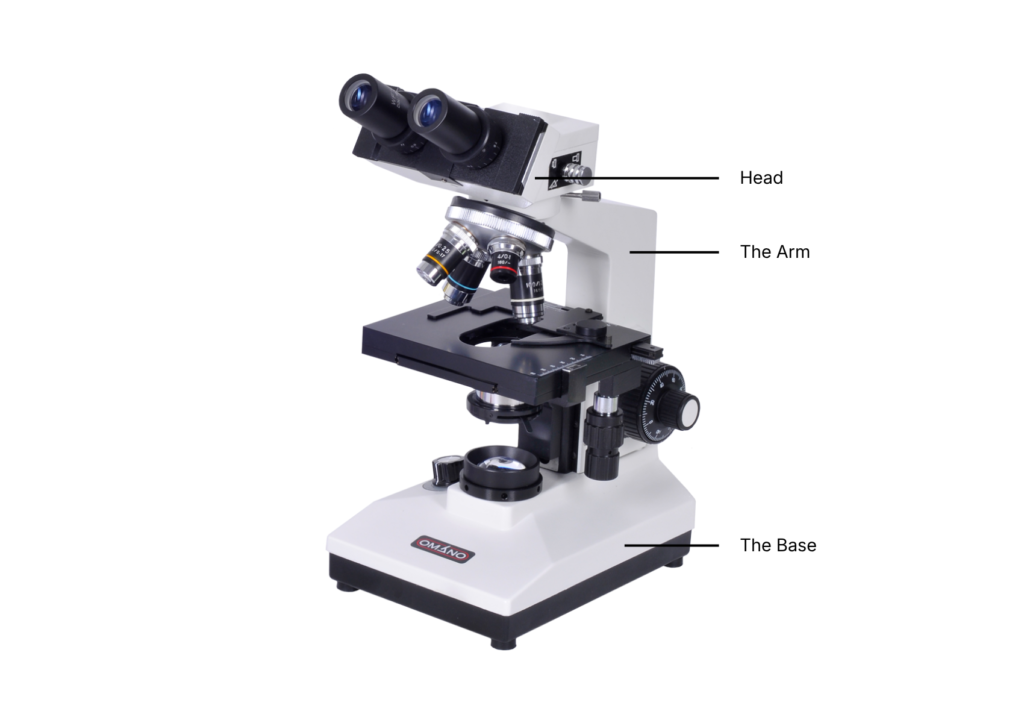
Figure 2: Structural Parts of a Microscope
2. Arm: The arm, also referred to as the limp, is the backbone of the microscope that connects the head to base. Arm provides the mechanical support and stability for optical components such as eyepiece, nosepiece and stage. The arm also serves another purpose as a carrying handle. Some high-quality microscopes have an articulated arm with more than few joints, allowing movement of the head.
3. Base: The base is the foundation part of the microscope that supports the entire weight of the microscope and provides stability. Base prevents microscope tipping, minimizes vibrations which could interfere with image clarity. In modern microscopes base houses built-in illuminator, light switch and other electrical components.
Optical Parts of a Microscope and its Functions
The optical parts are the important parts of the microscope that are used to magnify and view the specimen.
1. Eyepiece: The eyepiece or ocular lens is located at the top of the microscope. The eyepiece is used to look at the specimen. The standard eyepiece has a magnification of 10X. You can choose with an optional eyepiece ranging from 5X to 30X. The eyepiece magnifies the image for the second time.
2. Eyepiece Tube: The eyepiece tube carries the eyepiece. It holds the eyepiece in the correct place and it aligns perfectly with objective lenses. In addition, the eyepiece tube also places the eyepiece and objective lenses within a correct distance range. Binocular microscopes, eyepiece tubes are flexible and can be adjusted to maximize the visualization.
3. Diopter Adjustment: A control diopter adjustment ring present only in the binocular microscope. Diopter adjustment allows users to adjust for differences in vision between the two eyes.
4. Nose piece: The nosepiece holds the objective lenses and rotates to allow easy switching between different magnification levels. Standard magnification levels are 4X, 10X, 40X, and 100X. Objective lenses are color codes 4x lens marked by a red ring, 10x marked by a yellow ring, 40X marked by a blue ring and 100X marked by a white ring. The oil immersion lens must be used by placing a drop of immersion oil on the slide.
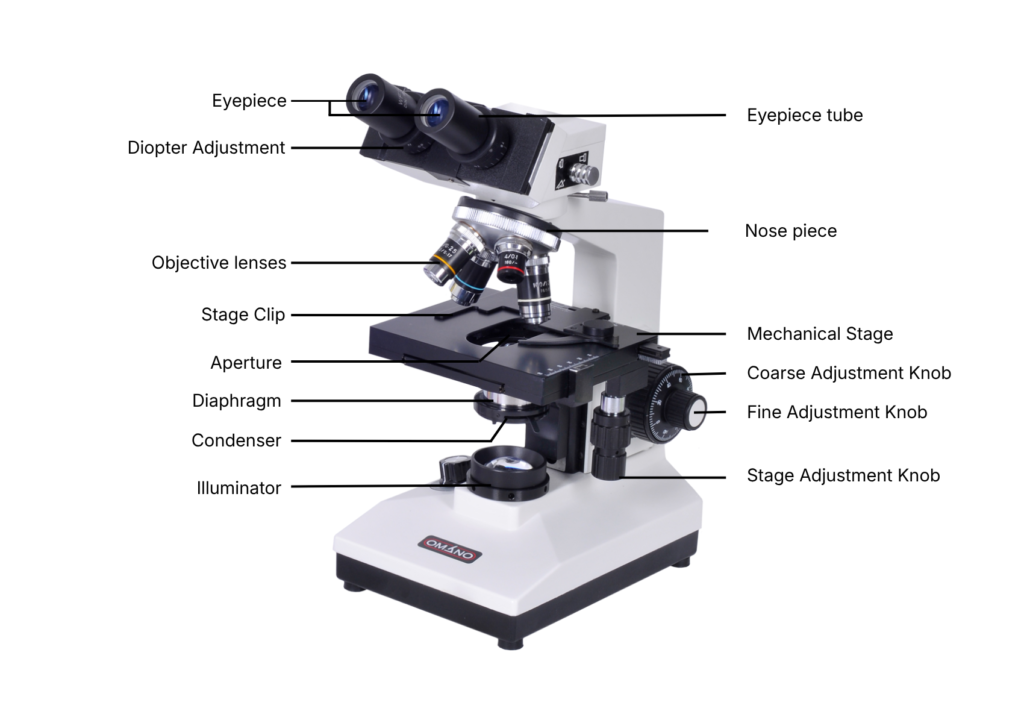
Figure 2: Optical Parts of a Microscope
5. Adjustment knobs: Adjustment knobs are located over the objective lenses and there are two types of adjustable knobs commonly known as fine adjustment knob and the coarse focus knob.
- Fine adjustment knob: The fine adjustment knob is used for the fine adjustment to the stage. It is a smaller knob and it used to move the stage up or down very slowly. This fine adjustment is commonly used to sharpen the image, this fine adjustment is mostly used to view under high magnification.
- Coarse adjustment knob: The coarse adjustment knob is used for focusing the image under lower magnification (4x and 10x). It is a larger knob and it helps to adjust the stage rapidly.
6. Stage: The stage is a flat metal platform that supports the microscope slides. The stage has a hole called aperture for illuminating beam or light passing through. The simple or mechanical clips hold the slides in place.
7. Stage Control Knobs: If your microscope has a mechanical stage, stage control knobs are used to move the stage mechanically. The slide secured on the slide holder can be moved in two perpendiculars (X – Y) directions by turning two knobs. One knob moves the slide left and right; the other moves it forward and backward.
8. Aperture: The aperture is the opening in the stage that allows the illuminating beam of light to pass through the specimen. Intensity of the light source plays a very important role in how well the specimen is illuminated.
9. Illuminator: In old microscopes mirrors are used to reflect the external light source, commonly sun light. Modern microscopes contain an internal source of light known as an illuminator located at the base of the microscope. Halogen bulbs are commonly used to provide a light source. Currently, LED lights are becoming more popular. Here are some other commonly used illuminators; tungsten-halogen lamps, 75-150W Xenon lamps, tin-halide lamps, mercury vapor lamps.
10. Condenser: A condenser lens is used to collect and focus light from the illuminator into the specimen. Condenser can be found under the stage next to the diaphragm or in conjunction with an iris diaphragm. Condensers play a major role in getting clear and sharp images at 400X or above. Most advanced microscopes come with an Abbe condenser that has a high magnification of about 1000X.
11. Diaphragm: Diaphragm or also known as the iris diaphragm, controls the amount of light reaching the specimen from the illuminator. Adjusting it helps improve contrast and detail, particularly when observing transparent samples. For advanced microscopes, the diaphragm comes attached with an Abbe condenser to better control both light intensity and focus.
12. Condenser focus knob: The condenser focus knob adjusts the condenser. The condenser knob focus helps in the up-down movement of the condenser. This adjustment allows you to fine tune how the light is focused on the specimen.
13. The rack stop: The rack stop controls how close the objective lens can move toward the specimen slide. This factory safety prevents students and beginners from damaging slides or objective lenses.
14. Light Switch: A light switch is an electrical control device, light switches are used to turn on or off the illuminator.
15. Brightness Adjustment: The brightness adjustment wheel system controls the voltage supplied to the light source. Adjusting the voltage supplied to the light bulb directly influences the intensity of brightness.
How Does a Microscope Work?
To operate a simple light microscope, a thin specimen attached to the glass slide is placed on the stage. Light from the illuminator passes through the condenser and diaphragm and illuminates the sample. As light travels through the specimen, it enters the objective lens where it is first magnified. The preliminary magnified image is further enlarged by the eyepiece, allowing the user to see a highly magnified, clear image.